Passkeys on iPhone in 2026: how to switch from passwords safely, use them on other devices, and recover access
Passkeys are no longer a “future feature” — by 2026 they’re an everyday sign-in option across many major apps and websites. Instead of memorising passwords and juggling one-time codes, you approve logins with Face ID or Touch ID, while your iPhone handles the security behind the scenes. Done properly, passkeys reduce phishing risk and make account takeovers far harder. But switching is not just one button: you need to enable the right iPhone settings, migrate accounts carefully, and understand recovery so you don’t lose access when changing devices.
What passkeys are, and why they outperform passwords in day-to-day security
A passkey is a password replacement built on modern public-key cryptography (FIDO/WebAuthn). When you create one, your iPhone generates a unique key pair for that specific account: a private key stays on your device, and a public key is stored by the service. The service never receives the private key, which means there’s nothing “reusable” sitting in a database that criminals can steal and replay later.
This is the big difference compared to traditional logins. Passwords can be guessed, reused, leaked in breaches, or typed into fake websites. Even two-factor authentication isn’t a complete fix because people still get tricked into approving prompts or giving away codes. Passkeys are designed to resist phishing because your device only signs a login request for the real website/app you intended to use, not for a look-alike domain.
In plain terms, passkeys shift security away from “what you know” (a password that can be copied) to “what you have” (your trusted device) plus “who you are” (Face ID/Touch ID). That doesn’t remove every possible risk, but it eliminates the most common path attackers use: stealing or tricking you into giving up a password.
How passkeys are stored on iPhone, and what iCloud Keychain actually does
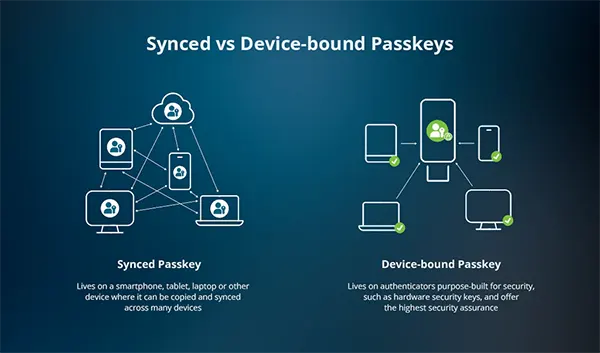
On iPhone, passkeys are encrypted and stored in iCloud Keychain. If iCloud Keychain is enabled, your passkeys can sync across your Apple devices signed in with the same Apple Account — for example, your iPad or Mac. This is why passkeys feel effortless in the Apple ecosystem: you create them once and then just authenticate locally with Face ID, Touch ID, or your device passcode.
iCloud Keychain is more than a “password list”. It is the underlying secure storage that also keeps passkeys, Wi-Fi credentials, and payment-related autofill data. In 2026, Apple also makes passkey management simpler through the Passwords app experience (introduced with iOS 18), which brings passkeys, passwords, verification codes, and security warnings into one dedicated place instead of scattering them across settings.
One crucial point: passkeys are not the same as turning off passwords. Most services keep your password as a fallback until you manually remove it. That means you can migrate gradually — which is exactly what you should do if you want a safe transition.
Setting up passkeys correctly on iPhone (and avoiding the usual migration mistakes)
A reliable passkey setup starts with your Apple Account and iCloud Keychain. Passkeys on iPhone require iCloud Keychain and Apple’s two-factor authentication to be enabled. If either is off, passkeys won’t sync properly and recovery becomes more complicated than it needs to be. Before creating your first passkey, confirm that iCloud Keychain is active and that you can receive Apple Account verification codes on a trusted device or number.
The safest migration approach is staged. Start with your most critical accounts — email, Apple Account, cloud storage, and any service that would be painful to lose. Create a passkey, then immediately test it by signing out and back in. After that, test sign-in on another device you own (for example, your Mac). Only once you’ve confirmed it works in more than one place should you consider changing or disabling the old password (if the service even allows it).
Also be realistic about coverage. Even in 2026, not every service supports passkeys, and some implement them differently (some treat passkeys as a second sign-in method rather than the default). Your goal is not to force passkeys everywhere overnight; your goal is to replace passwords where it genuinely improves security and usability, while keeping a safety net for recovery.
Step-by-step: a safe passkey rollout plan you can actually follow
Step 1 — prepare your iPhone. Update iOS, enable iCloud Keychain, and confirm your Apple Account has two-factor authentication turned on. Then open the Passwords app (or the Passwords section in settings, depending on iOS version) and make sure you can see your saved credentials. This confirms your device is in a healthy state before you add passkeys into the mix.
Step 2 — migrate high-value accounts first. In each service, go to security settings and look for “Create passkey”, “Add passkey”, or “Sign in without a password”. Create the passkey on your iPhone and test it immediately. Keep existing 2FA and recovery email/phone details up to date until you’ve used the passkey for a while and trust the setup.
Step 3 — clean up only when you’re confident. If the service allows it, you can remove old passwords later. Some people rush this and then panic when they switch devices or a sync issue appears. It’s better to keep a fallback for a few weeks, then remove it once you know your passkey workflow is stable.
Using passkeys on Mac and Windows in 2026: what works smoothly, and what needs planning
If you stay within Apple devices, passkeys are generally simple: iCloud Keychain keeps them available across your iPhone, iPad, and Mac. When you sign in on Mac, you approve the login using Touch ID, your Mac login, or another local authentication method depending on the model. It feels like unlocking your device because that’s effectively what you’re doing — you’re authorising the cryptographic sign-in locally.
On Windows, the experience has improved a lot by 2026 but still depends on your setup. Apple’s official iCloud for Windows supports iCloud Passwords, which can bring your iCloud Keychain credentials into browsers such as Chrome, Edge, and Firefox via an extension. This is particularly useful if your everyday workflow involves a Windows PC but you still want your iPhone-based passkeys and saved logins to be accessible without copy-pasting secrets.
There is also a common cross-device method: signing in on a PC by approving a prompt with your iPhone. Some services show a QR code or a passkey prompt that your phone can confirm. This is the practical benefit of passkeys: your iPhone can act as the authenticator even when you’re logging in elsewhere, without you typing a password at all.
Browser and ecosystem pitfalls: why passkeys sometimes “don’t show up”
The most frequent confusion is that passkeys can be saved in different credential systems depending on where you created them. If you create a passkey in Safari on iPhone, it typically goes into iCloud Keychain. If you create it in Chrome while signed into Google, it may be saved in Google’s password manager instead. Both are valid, but they behave differently when syncing across devices and browsers.
A second issue is duplicate sign-in options. Many sites will continue showing a password field even after you create a passkey, which leads people to keep using old habits. If the site offers it, set passkeys as the default sign-in method in account settings, then keep your password only as a backup until you’re fully confident.
Finally, remember that passkeys are tied to your Apple Account and iCloud Keychain settings. If you sign out of iCloud, disable Keychain, or switch Apple Accounts, you may think your passkeys vanished — but it’s usually a sync or account context problem, not actual data loss.